
Translate Figma, Photoshop, Canva & Illustrator graphics automatically
None of these tools export a translatable, auto-fitting layout — but a thin InDesign wrapper around your existing artwork turns them into one, with zero design rework.
The honest starting point
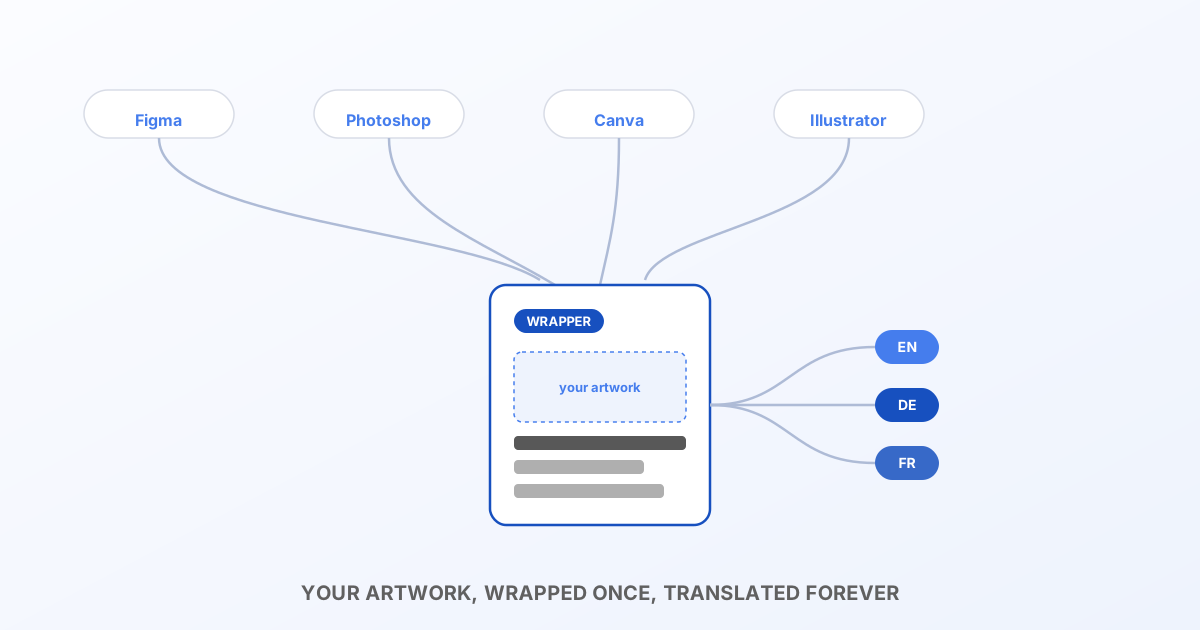
Figma, Photoshop, Canva and Illustrator don't export IDML — that's an InDesign-only format, and Bluepic's translation engine works on IDML. So this isn't "upload your Figma file and get eight languages back." It's something more useful once you know it exists: your artwork stays exactly as-is, in whatever tool you made it in — InDesign becomes a thin, one-time wrapper around it that carries the translatable text and does the auto-fitting.
This is not a workaround; it's the same production pattern print and marketing teams have used for decades. A poster's photography comes from Photoshop, its icon set from Illustrator, its background from Figma or Canva — and InDesign is the assembly layer that places all of it and adds the type on top. All this tutorial does is point that same assembly layer at Bluepic's API instead of a human's export button.
Step 1 — export your artwork as a flat file
From whichever tool made the graphic:
- Figma —
Export→ PNG, JPG or PDF. - Canva —
Share → Download→ PNG, JPG or PDF. - Photoshop — save as PSD (kept as layers) or export a flattened PNG/JPG.
- Illustrator — save as AI (kept as vector) or export a flattened PNG/JPG/PDF.
If you're not sure which to pick: PDF works from all four tools and is the simplest universal choice. Photoshop's native PSD and Illustrator's native AI also work directly — you don't have to flatten them first.
Step 2 — place it in a lightweight InDesign file
Open (or create) an InDesign document, File → Place your exported artwork, position it, and add your text frames on top — headline, body copy, call to action, whatever needs to vary per language. This InDesign file doesn't need to be a "real" layout in the traditional sense; its only job is to hold your artwork and your translatable text frames in one place. Export it: File → Export → InDesign Markup (IDML).
Two things worth getting right while you're drawing those frames: size each one with headroom for your longest expected language (the frame's size becomes a hard ceiling, not a starting point), and keep one frame's formatting uniform if you want it to stay one overridable unit rather than silently splitting into several. Both are covered in Text frames, bounds & best practices.
Step 3 — send it to Bluepic, same as any IDML
This is where it stops being special-cased. Whether the file underneath is a native InDesign document or a thin wrapper around a Photoshop export, the API doesn't know the difference:
POST https://api.bluepic.io/api/idml/render
Authorization: <your API key>
Content-Type: multipart/form-data

[email protected]
[email protected]
textOverrides={"0:TextFrame_headline":"Willkommen in Berlin"}
PDF, AI, EPS and PSD assets are rasterized automatically, server-side — you don't need Photoshop or Illustrator installed anywhere in your pipeline to handle a linked PSD or AI file; Bluepic converts it to a print-quality raster the same way it would if you'd flattened it yourself. Anything you don't mention in textOverrides keeps its source text, so this is the exact same mechanism used in Translate InDesign projects automatically — the artwork's origin doesn't change how translation works at all.
What you get for that five minutes of setup
- Every language re-fits into the same text frames automatically — no manual resizing per locale, whether the underlying art came from Figma, Canva, Photoshop or Illustrator.
- The artwork itself is never touched or re-generated — you keep full creative control in the tool you already use.
- One API call per language, scriptable from wherever your translations already live (a CMS, a spreadsheet, a translation-memory export).
What this doesn't do
To be precise about the boundary: this doesn't give you live editing of a Figma or Canva design, and it doesn't reach into a PSD's individual layers to translate text baked into the artwork itself (a headline rendered as pixels inside Photoshop, for example, stays exactly as exported — only text frames you add in the InDesign wrapper are translatable). If your source text is baked into the graphic, pull it out into an InDesign text frame once; from then on it's automatable.
Next steps
- Try the interactive playground with a wrapper file built around your own artwork.
- See Automate Figma, Photoshop, Canva & Illustrator graphics for the same pattern applied beyond translation — batch variants, personalization, sizes.
- Read the full API reference for every render option.
- If a text frame needs mixed formatting (part bold, a different color), see Rich text format for overrides for the value shape it needs.